Using the Editor
After Cliptude's AI pipeline finishes generating your video, you can open the built-in timeline editor to make precise changes — trim scenes, swap footage, regenerate voiceover segments, add data animations, and adjust text — without starting over. Changes are applied by triggering a re-render that recomposes the full MP4 with your edits.
Opening the Editor
The editor becomes available once your video has finished processing. Navigate to your video's progress page — you'll see an Open Editor button appear when the pipeline completes. Clicking it launches the editor in a new tab, pre-loaded with your generated project.
Note: If you close the editor tab, your project is saved automatically. Re-open it any time from the progress page using the Continue Editing button. All scene edits, media swaps, and voiceover changes are persisted between sessions.
Interface Overview
The editor is divided into four main areas. Understanding each one makes it easier to navigate and make the right kind of edits efficiently.
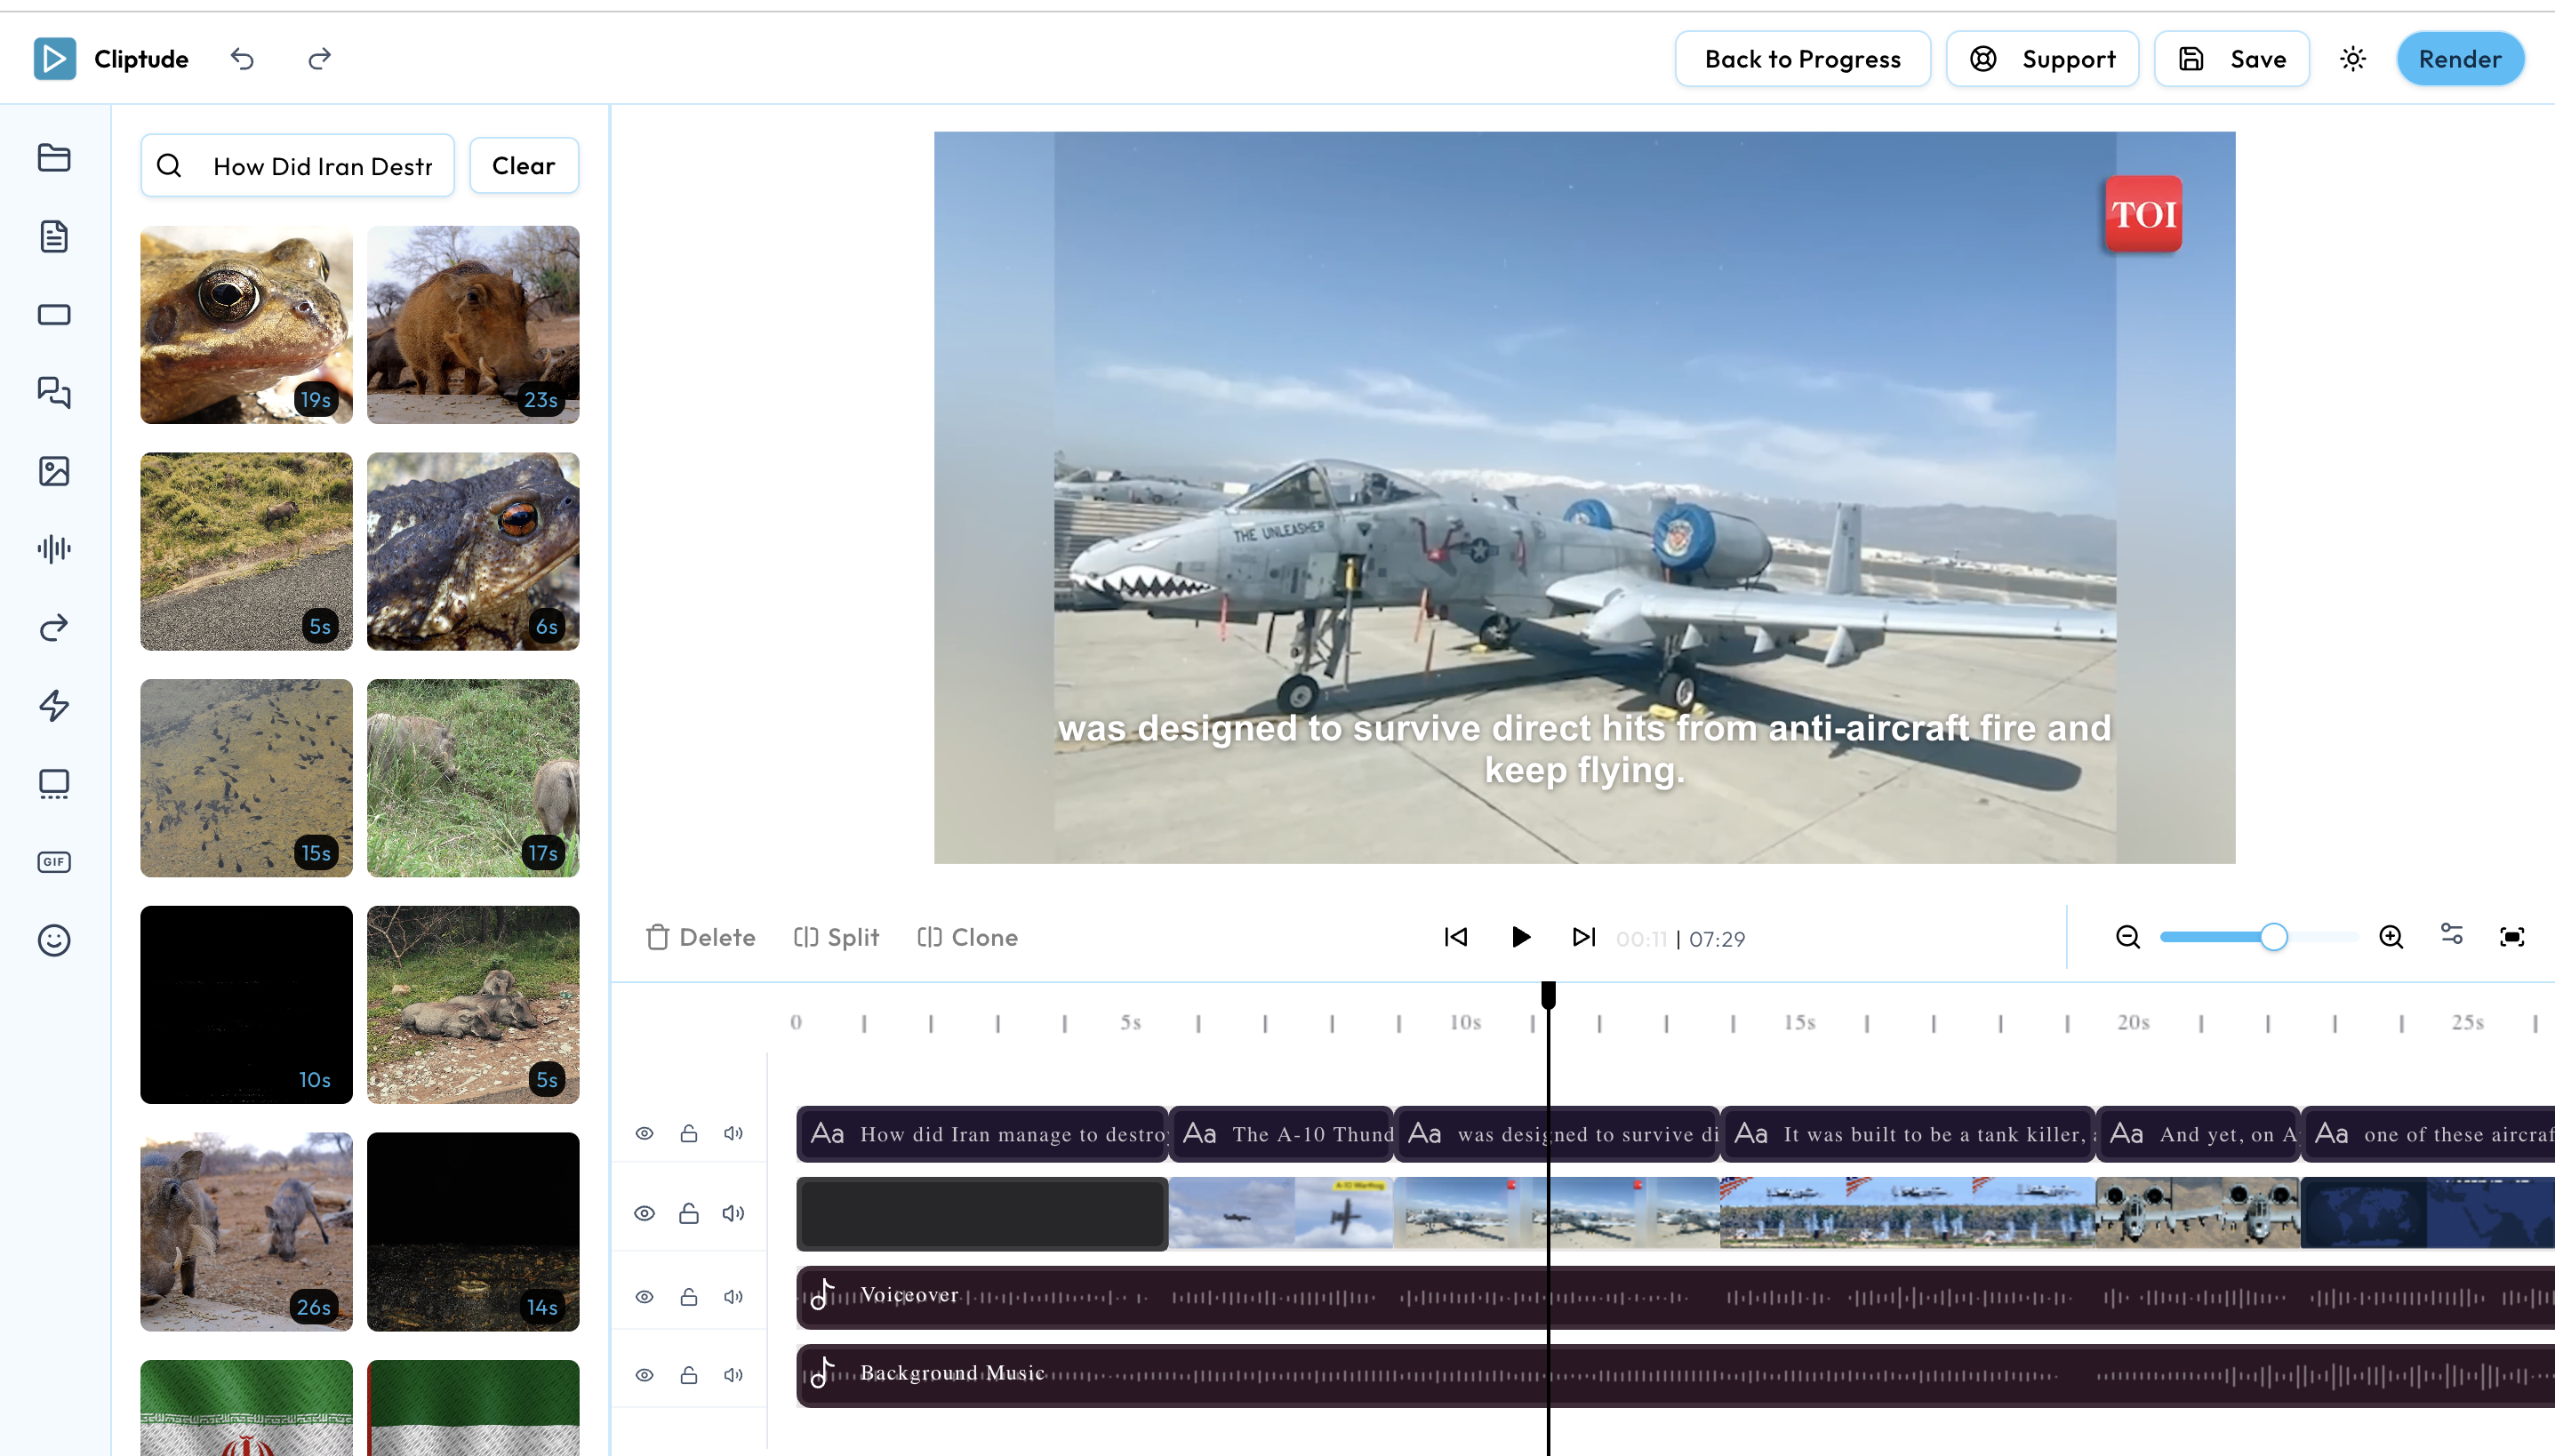
Timeline
A multi-track horizontal timeline showing every scene, voiceover segment, background music track, and SFX clip. Drag clips to reorder, drag edges to trim, and scrub the playhead to preview any moment in your video.
Preview Canvas
A live preview of the current frame on the timeline. Supports play/pause with audio so you can review any edit in context before committing to a full re-render. Reflects the exact aspect ratio of your output (16:9, 9:16, 1:1, or 4:5).
Properties Panel
Context-sensitive controls for the currently selected clip. Select a text element to adjust font, size, and color. Select a media clip to trim it or replace it. Select a caption track to change its style. The panel adapts based on what's selected.
Sidebar Panels
A set of icon tabs on the left edge open panels for adding new content — stock images, stock video, audio, text, captions, GIFs, emojis, animations, voiceover, SFX, and your own uploads. Drag any item from a panel directly onto the timeline.
Working with Scenes
Every scene generated by the pipeline appears as a separate clip on the video track. You can rearrange, trim, or remove scenes directly on the timeline without affecting the rest of the project.
Reorder
Click and drag a scene clip left or right on the timeline to change its position. Other clips shift automatically to fill the gap.
Trim
Hover over the left or right edge of a clip until the resize cursor appears, then drag inward to shorten it. Trimming affects only that clip — it doesn't shift adjacent ones unless you close the gap manually.
Delete
Select a clip and press Delete or Backspace to remove it. The voiceover segment attached to that scene is removed simultaneously.
Swapping Media
If the AI-sourced footage for a scene isn't quite right, you can replace it with a clip or image from the built-in stock media libraries — Pexels, Pixabay, and Giphy are available directly inside the editor. You can also upload your own files.
-
1
Open the Videos or Images panel from the left sidebar icon tabs.
-
2
Type a keyword in the search bar. Results are pulled live from Pexels and Pixabay.
-
3
Drag the clip onto the timeline over the scene you want to replace, or click it to insert it at the playhead position.
-
4
Trim the new clip to match the duration of the voiceover segment using the edge-drag method described above.
Own Footage
Open the Uploads panel to drag in your own MP4s, MOVs, JPEGs, or PNGs. Files are uploaded securely to cloud storage and are available immediately on the timeline. Uploads are tied to your account and persist across projects.
Captions & Text
Cliptude auto-generates captions from the AI voiceover using Whisper transcription. The editor lets you change the visual style of those captions and add freeform text overlays independently.
Caption Styles
Open the Captions panel on the left sidebar. Scroll through the available presets — each shows a live preview thumbnail. Click a style to apply it globally to all caption segments in the project. Styles control font, size, color, background fill, and word-highlight behavior.
Text Overlays
Open the Texts panel to add a freeform text block at the playhead position. Once on the timeline, select the text clip and use the Properties Panel on the right to change the content, font family, size, color, and on-screen position. Text overlays are independent of captions and can be stacked.
Voiceover Regeneration
Every voiceover segment is tied to a scene. If you want to change the narration text, fix a mispronunciation, or switch to a different ElevenLabs voice, you can regenerate individual segments directly inside the editor without re-running the full pipeline.
-
1
Open the AI Voice panel from the left sidebar.
-
2
Select a voice from the dropdown. You can preview any voice with a sample clip before applying it.
-
3
Type or edit the narration text for the segment, then click Generate. The new audio is placed on the voiceover track at the correct position.
Timing tip: After regenerating a voiceover segment, check whether the new audio is longer or shorter than the original. If so, trim or extend the corresponding scene clip on the video track to match the new duration before re-rendering.
Animations
The editor exposes the same library of animated data-visualization components used by the AI pipeline. You can insert any animation type into your project and configure it manually, or use the Autofill feature to have the LLM populate the data fields from your script context automatically.
Counters & Stats
Animated number counters, percentage rings, and stat cards. Ideal for showing key metrics inline with narration.
Bar & Line Charts
D3-powered animated bar charts and line graphs that draw in on screen. Accepts any numeric dataset.
Kinetic Typography
Words and phrases that animate onto screen with motion blur, bounce, or type-writer effects synchronized to the voiceover.
Maps & Timelines
Animated city/region fly-overs, route maps, and horizontal timeline sequences with labeled events.
Mind Maps
Branching node diagrams that expand outward. Great for explaining hierarchies, processes, or concept relationships.
Comparison Splits
Side-by-side animated panels for before/after comparisons, feature tables, or two-option breakdowns.
Autofill: When adding an animation, click the Autofill from script button. The LLM reads the surrounding narration and populates all data fields — labels, values, colors — automatically. You can edit any field afterward to fine-tune the result before placing the animation on the timeline.
Transitions, SFX & Music
Polish the pacing of your video with scene transitions, sound effects, and a background music track. All are optional and can be changed or removed without affecting the voiceover or footage edits.
Transitions
Open the Transitions panel. Drag a transition style onto the join between two clips on the timeline. Supported styles include fade, dissolve, slide, and whip pan. Hover over any transition on the timeline to delete or swap it.
Sound Effects
Open the SFX panel and browse categorized clips. Drag an SFX onto the timeline to place it on its own track at any position. Use the Properties Panel to adjust volume relative to the voiceover.
Background Music
Open the Audios panel to browse royalty-free music tracks. Drag a track onto the audio layer below the voiceover. The pipeline audio mixer keeps music ducked under the voiceover automatically at re-render time.
Re-Rendering Your Video
When you're satisfied with your edits, click the Render button in the top navbar. Cliptude saves your project state and submits a compositing job. FFmpeg reassembles all tracks — video clips, voiceover, captions, animations, transitions, SFX, and music — into a final MP4. The result replaces your previous export and is available for download on the progress page.
Tips before you render
- • Scrub the full timeline in the preview canvas to catch any gaps or visual glitches before submitting.
- • Ensure every voiceover segment aligns with its corresponding scene clip — timing mismatches are the most common cause of audio drift.
- • Re-renders join the same queue as new videos. Paid users are routed to the high-priority queue, so render times are significantly shorter.
- • You can continue making further edits after a render completes — each render produces a new MP4 without overwriting your project state.
Frequently Asked Questions
Does the editor cost extra credits?
Opening and editing your project consumes no extra credits. Credits are deducted only when you trigger a re-render — the same way as a new video generation. The credit cost is based on the duration of the final output (~10 credits per minute).
Can I edit a video more than once?
Yes. Every render saves the updated project state. You can re-open the editor at any time, make further changes, and render again. Each render produces a new final MP4; previous renders are replaced by the latest one.
Can I reset the project back to the original AI output?
Yes. In the editor's top navbar, open the project menu and select Reset to original. This restores all scenes, voiceover, and timings to what the pipeline produced, discarding all manual edits. This action cannot be undone.
What video and image formats can I upload?
The editor accepts MP4, MOV, JPEG, PNG, and WebP files. For best results, upload footage at the same resolution and aspect ratio as your project output.